
Andrew Jesaitis


Nearly ten years, two researchers at Mitsubishi came up with a novel algorithm for resizing images while being careful to preserve areas of detail. They published this method in ACM in 2007, calling it “seam-carving”. Now improved versions of this algorithm are available in most major image editing programs such as Adobe Photoshop and Gimp.
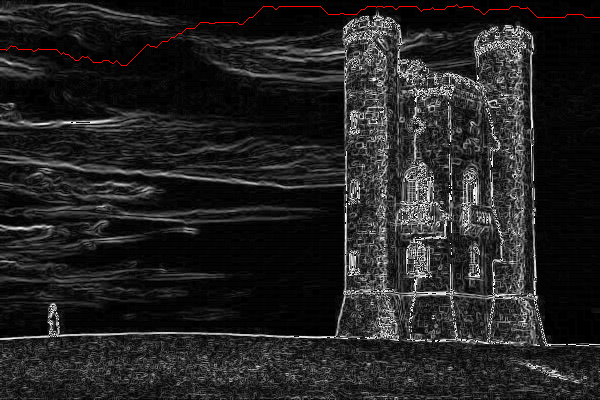
The lowest energy horizontal seam computed using a Sobel Operator.
The algorithm is quite simple and can be easily understood at an intuitive level. The idea behind it is to figure out the least disruptive path through image. Once that path is found we can either remove it to make the image smaller or duplicate it to expand the image. This process consists of 4 main stages.
This step isn’t strictly necessary, but makes the following steps simpler and more easily computable. The standard way to grayscale an image is to average the red, green, and blue channels with a special weightings. The typical weightings are 0.2989 * R + 0.5870 * G + 0.1140 * B. These values are used since humans don’t perceive each channel equally and using this weighting produces a more “dynamic” image. For more information check out this piece by Charles Poynton.
The first thing that we need to figure out is where the image intensity changes. Essentially these are edges in the image and areas that our path will want to avoid. We can do this by finding the gradient of the image.
What’s the image gradient? It’s the derivative of the image. Ahhhh, derivatives!!! Before, you delete your entire photostream due to flashbacks of high school calculus, we just need to step back and take a breath. Okay better – what’s a derivative? It’s just a fancy word for subtraction. In this case, we subtract neighboring pixel values left to right for dx and top to bottom for dy. Since we don’t want to consider these derivatives individually we square them, add them together and take the square root of that mess. This is the magnitude of the gradient vector for you math geeks.
If you notice in the Carver app, I actually give you the option to use something called the “Sobel” operator. What’s this option? Instead of just considering the change in the horizontal and vertical directions, we can incorporate the change in intensities along the diagonal by using this setting. Since subtraction is really best left to Mrs. Lily’s second grade math class, we’ll use a more clever method. We can do something called a convolution, which has the same flavor of our subtraction process before (summing up differences), but now it’s just written as a single operation. So with this option we convolve the Sobel kernel with our image and again find the gradient magnitude.
Now that we have calculated how much the image is changing at every point, we need to go one step further and figure out the cost of removing that pixel and all the ones before it (i.e. how much energy does that pixel contain). To do this we can use dynamic programing.
We start with the top row, where each pixel’s energy is simply it’s gradient value.
Here’s the dynamic part, we define the pixel’s energy to be it’s gradient magnitude plus the lowest energy value of the neighboring pixels in the row above (i.e. NW, N, and NE pixels). Since we are being clever, let’s also note which neighboring pixel we choose; this will come in handy – trust me. Anyway, we continue iterating over the image, using our freshly computed energy values as we advance down rows. At the end we are left with the last row’s values representing the total energy of the seam ending in this pixel. Rad!
We already did all the hard work in the previous step because we were smart when we decided to add the lowest energy neighbor to get the current pixel’s energy. This means that our seams are optimal – the lowest energy path starts with the pixel in the last row with the lowest value.
So we have our starting point, now we need the rest of the path. Remember, how we noted which pixel we used in the energy calculation, we can use that pixel as our next pixel in the path. We continue to trace our way up these low energy pixels back to the top. And we have our optimal seam!
To remove a seam we iterate over the original image, copying pixel values into a new array. We use the original pixel value up to the seam and after the seam we just use the next one over. Now our image is one pixel narrower.
Adding a seam is a bit trickier. We’d like to just duplicate the lowest energy seam. But, if we do this we’ll end up duplicating the same seam over and over, introducing a smear effect. Not so ideal…
Instead, we can pre-calculate the number of low energy seams we want to add. Then we duplicate each of these. The only trick here is to think ahead and realize that some of these seams may overlap, so we need to insert the seam on the left side each time.
It’s pretty cool that we can figure out what areas of an image aren’t that important and get rid of them, without having to “know” what the image is. Instead with a little linear algebra we are able to resize images without disrupting the content. You can check out my demo of this algorithm here.
Avidan, Shai, and Ariel Shamir. “Seam carving for content-aware image resizing.” ACM Transactions on graphics (TOG). Vol. 26. No. 3. ACM, 2007. Rubinstein, Michael, Ariel Shamir, and Shai Avidan. “Improved seam carving for video retargeting.” ACM transactions on graphics (TOG). Vol. 27. No. 3. ACM, 2008.
Tower – https://en.wikipedia.org/wiki/Seam_carving#/media/File:Broadway_tower_edit.jpg
Ballon (Garrent Heath) – https://www.flickr.com/photos/garrettheath/10262324124